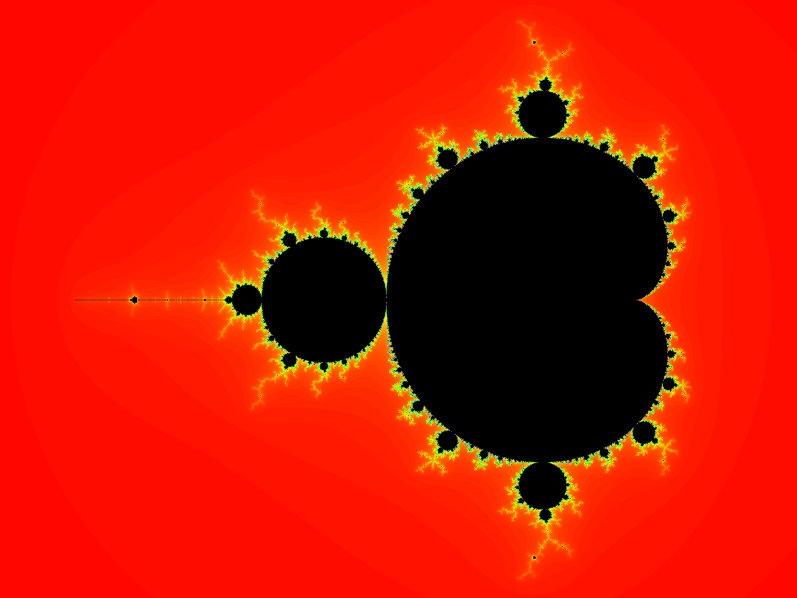
Solche Grafiken hat sicher jeder schon mal gesehen. Es handelt sich um die Darstellung der s.g. Apfelmännchen. Es sind berühmte, komplexe
fraktale Grafiken, die durch die Iteration mathematischer Formeln z_{n+1}=z_{n}^{2}+c im Komplexen entstehen. Entdeckt von Benoit Mandelbrot
1979, zeigen sie eine charakteristische, apfelähnliche Form mit unendlich detaillierten, selbstähnlichen Strukturen. Sie sind ein
klassisches Beispiel für die mathematische Chaos-Theorie.
Bildbox 1
Für mich bestand der Reiz in der Erinnerung an die frühen Versuche der 1980-er Jahre mit den damaligen 8-Bit Rechnern, als jeder sich an
Apfelmännchen versuchte. Auf einem heutigen Rechner ist das überhaupt keine Frage mehr. Aber wie verhält sich z.B. ein RP2040 Mikrocontroller?
Ich habe also zunächst auf einem PicoBoy Color, mit dem ich reichlich Erfahrung habe, eine Version in CircuitPython realisiert. Dann wollte ich
aber wissen, um wieviel schneller der Aufbau der Grafik geht, wenn man noch näher an der 'Maschinenebene' dran ist. Und die Variante in C++ mit der
Arduino-IDE ist wirklich überzeugend.
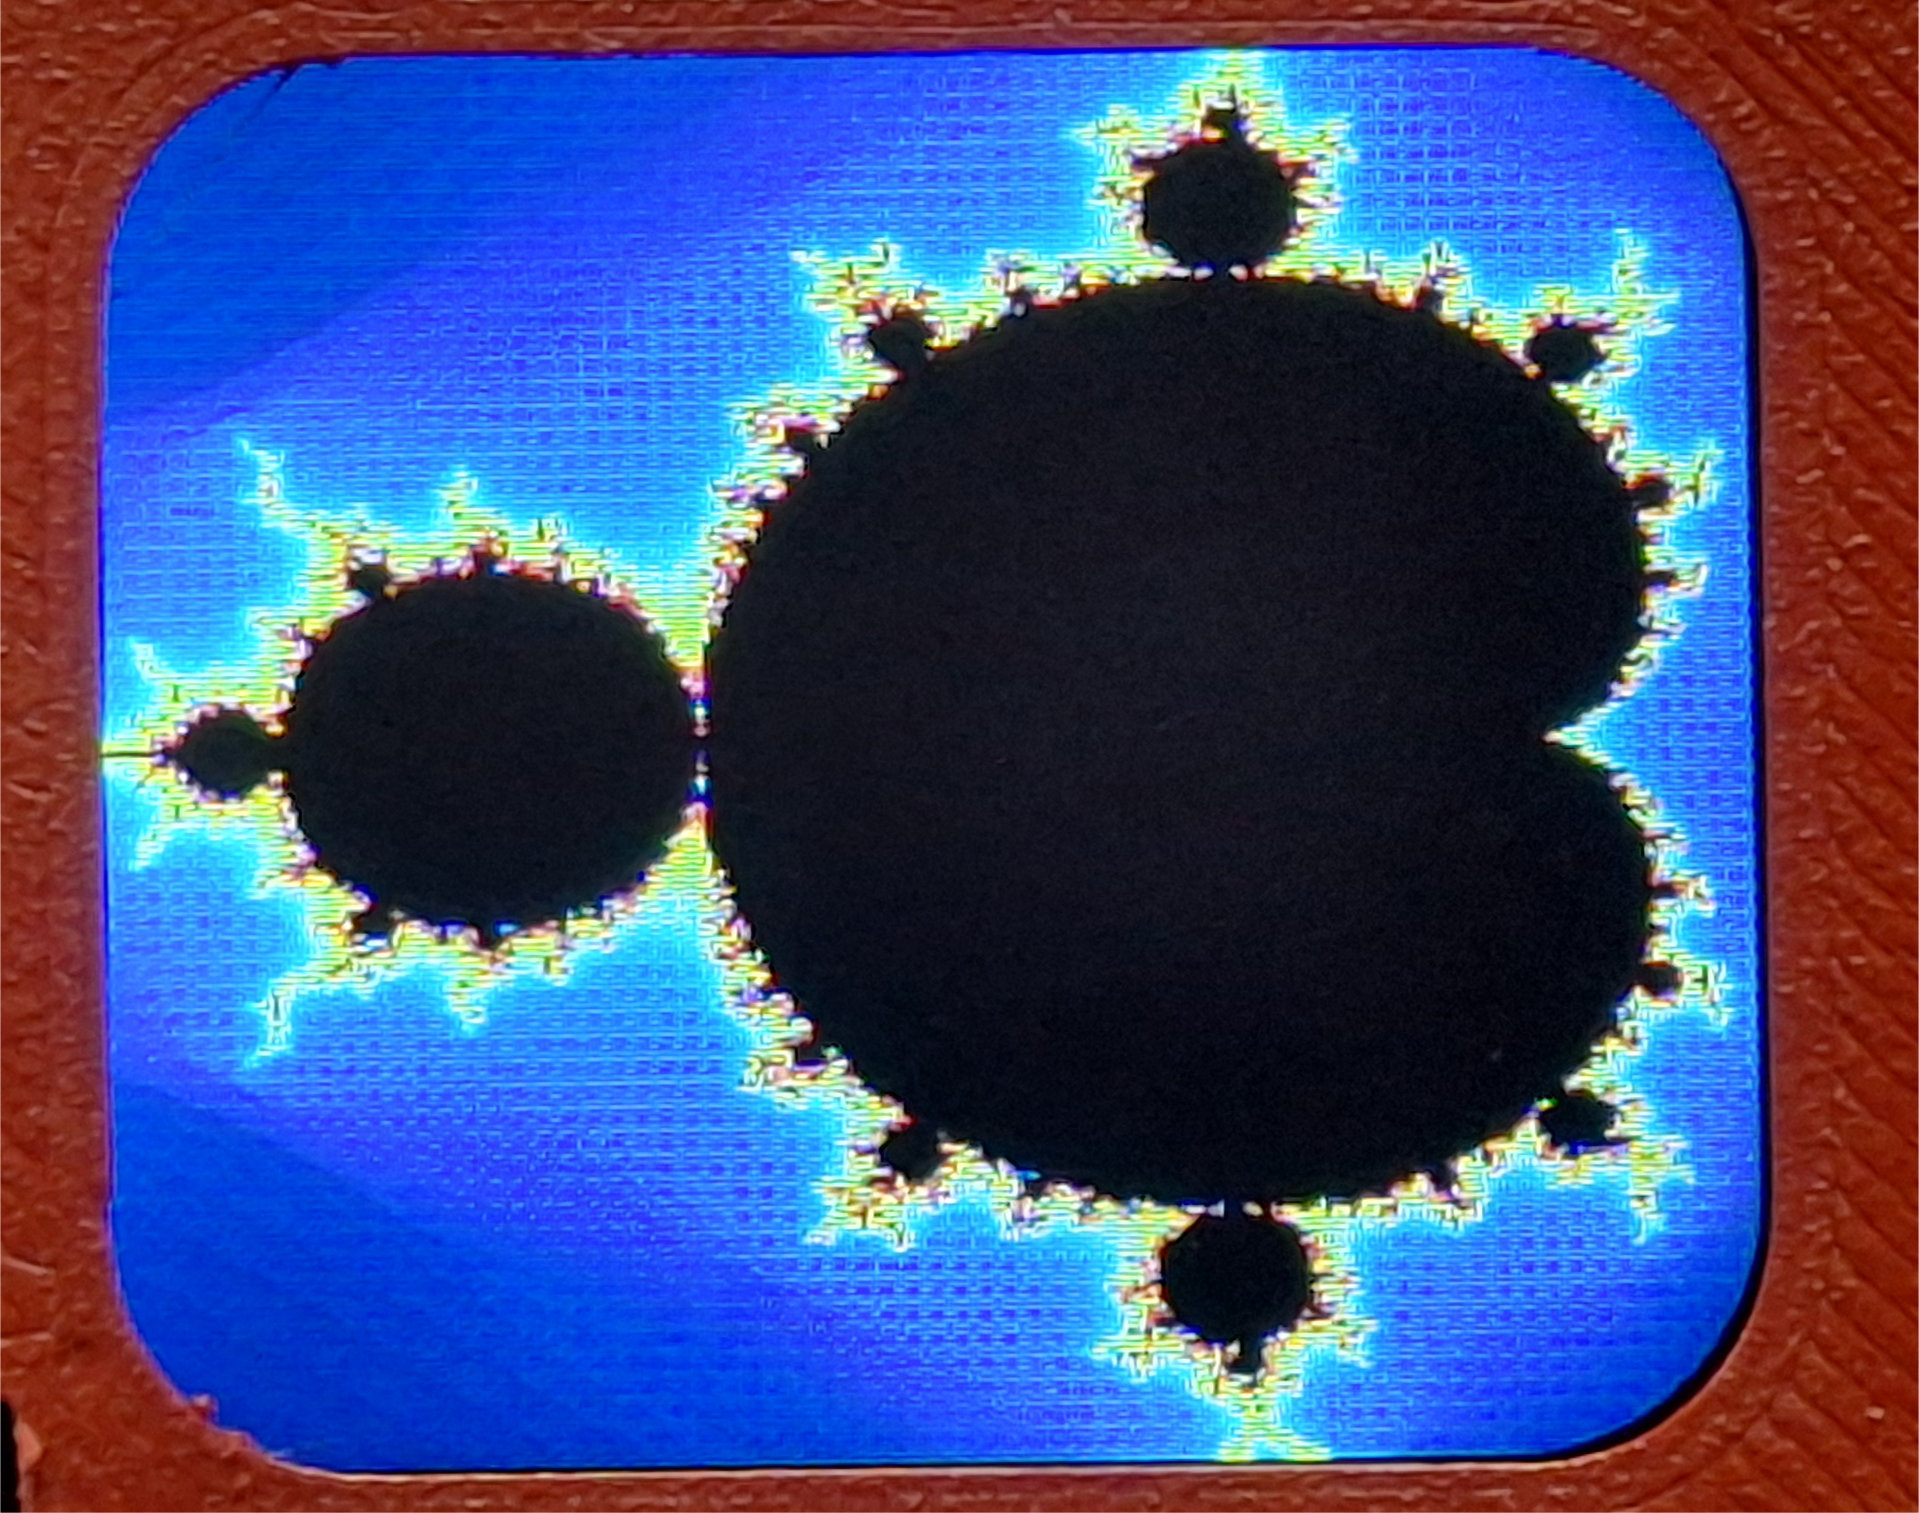
Nach meiner ersten Begeisterung zeige ich in der nachfolgenden Bildbox ein paar vom PicoBoy Color abfotografierten Grafiken:
Bildbox 2 (klick hier)
und dann zeige ich, wie Sie das auf Ihrem PicoBoy Color realisieren.
Um das Display des PBC mit seinem ST7789 Chip anzusteuern, brauchen wir in der Arduino-IDE zwei Bibliotheken. Wenn diese noch nicht installiert sind, tun wir
dies jetzt. Dazu öffnen Sie den Bibliotheksverwalter (linke Seite: Büchersymbol) und geben oben in der Textzeile
Adafruit GFX ein. Darauf wird die Adafruit GFX Library angezeigt und Sie klicken auf 'INSTALLIEREN'.
Das gleiche wiederholen Sie mit der Eingabe von Adafruit ST77. Es wird die Bibliothek Adafruit ST7735 and ST7789 Library angezeigt. Auch hier klicken Sie auf
'INSTALLIEREN'. Damit ist die IDE für den 'Sketch' vorbereitet. Den öffnen Sie im Dateimenü mit 'Neuer Sketch'. Ein neues Fenster geht auf.
Der vorgeschlagene Name orientiert sich am aktuellen Datum. Beim ersten Speichern vergeben Sie unabhängig davon einen eigenen Namen. Auch den
vorbereitete Quelltext
  void setup() {
  // put your setup code here, to run once:

}

void loop() {
  // put your main code here, to run repeatedly:

}
löschen Sie zunächst. Beginnen Sie mit der Eingabe der #include-Direktiven für Bibliotheken, gefolgt von optionalen Namensräumen, globalen Deklarationen wie im unteren Kasten gezeigt. Die Kommentarzeilen beschreiben jeweils, was definiert wird.
  #include <Adafruit_GFX.h>
#include <Adafruit_ST7789.h>
#include <SPI.h>

// ==== Pins ====
#define TFT_CS   10
#define TFT_RST  9
#define TFT_DC   8
#define TFT_BLK  26

#define KEY_DOWN    1
#define KEY_LEFT    2
#define KEY_UP      3
#define KEY_RIGHT   4
#define KEY_CENTER  0
#define KEY_A       27
#define KEY_B       28

Adafruit_ST7789 tft = Adafruit_ST7789(TFT_CS, TFT_DC, TFT_RST);

// ==== Mandelbrot & Zoom ====
const int MAX_ITER = 150;
#define PALETTE_SIZE 7
uint16_t PALETTE[PALETTE_SIZE];
float xmin = -1.5, xmax = 0.5;
float ymin = -1.0, ymax = 1.0;

// Zoom-Faktor:
float zoomFactor = 0.25;

// ==== Rechteck für Zoom (1/16 oder 1/64 des Displays) ====
#define RECT_W 70
#define RECT_H 60

#define RECT_HALF_W (RECT_W / 2)
#define RECT_HALF_H (RECT_H / 2)
#define RECT_PIXELS (RECT_W*2 + RECT_H*2)
uint16_t rectBackground[RECT_PIXELS];

// ==== Mittelpunkt des Rechtecks ====
int cursorX, cursorY;

// Flag, ob Fraktal fertig ist
bool fractalReady = false;
Im 'Setup' werden dann die Pins auf Eingaben geschaltet, die Farbpalette und das Zoom-Rechteck definiert sowie der Aufruf der Funktion 'drawMandelbrot()' vorbereitet. Das sehen Sie im nächsten Kasten:
  // ================= SETUP =================
void setup() {
  Serial.begin(115200);

  pinMode(TFT_BLK, OUTPUT);
  analogWrite(TFT_BLK, 255);

  tft.init(240, 280);
  tft.setRotation(3);
  tft.fillScreen(ST77XX_BLUE);

  // Pins als Input
  pinMode(KEY_RIGHT, INPUT_PULLUP);
  pinMode(KEY_DOWN, INPUT_PULLUP);
  pinMode(KEY_LEFT, INPUT_PULLUP);
  pinMode(KEY_UP, INPUT_PULLUP);
  pinMode(KEY_CENTER, INPUT_PULLUP);
  pinMode(KEY_A, INPUT_PULLUP);
  pinMode(KEY_B, INPUT_PULLUP);

  // Palette
  PALETTE[0] = tft.color565(0, 0, 0);
  PALETTE[1] = tft.color565(0, 0, 255);
  PALETTE[2] = tft.color565(0, 255, 255);
  PALETTE[3] = tft.color565(0, 255, 0);
  PALETTE[4] = tft.color565(255, 255, 0);
  PALETTE[5] = tft.color565(255, 0, 0);
  PALETTE[6] = tft.color565(255, 0, 255);

  // Rechteck in Bildschirmmitte
  cursorX = tft.width() / 2;
  cursorY = tft.height() / 2;

  // Initiales Fraktal zeichnen
  drawMandelbrot();
  fractalReady = true;

  // Rechteck speichern und zeichnen
  saveRectBackground(cursorX, cursorY);
  drawZoomRect();
}
Danach folgen die Endlosschleife ('loop()'), die Funktion zur Eingabeverarbeitung ('HandleInput()' und 'DrawMandelbrot()':
  // ================= LOOP =================
void loop() {
  handleInput(); // Rechteck bewegen & Zoom/Reset
}

// ================= EINGABEVERARBEITUNG =================
void handleInput() {
  int step = 5; // Anzahl Pixel pro Tastendruck
  int dx = 0, dy = 0;
  if (digitalRead(KEY_UP) == LOW)    dy = -step;
  if (digitalRead(KEY_DOWN) == LOW)  dy = step;
  if (digitalRead(KEY_LEFT) == LOW)  dx = -step;
  if (digitalRead(KEY_RIGHT) == LOW) dx = step;

  delay(100); // kurze Verzögerung

  int newX = constrain(cursorX + dx, RECT_HALF_W, tft.width() - RECT_HALF_W);
  int newY = constrain(cursorY + dy, RECT_HALF_H, tft.height() - RECT_HALF_H);

  if (newX != cursorX || newY != cursorY) {
    restoreRectBackground(cursorX, cursorY);
    cursorX = newX;
    cursorY = newY;
    saveRectBackground(cursorX, cursorY);
    drawZoomRect();
  }

  // Taste A ? hineinzoomen
  if (digitalRead(KEY_A) == LOW) {
    restoreRectBackground(cursorX, cursorY);
    zoomOnCursor(true);
    drawMandelbrot();
    saveRectBackground(cursorX, cursorY);
    drawZoomRect();
    delay(200);
  }

  // Taste B ? zurücksetzen
  if (digitalRead(KEY_B) == LOW) {
    restoreRectBackground(cursorX, cursorY);
    tft.fillScreen(ST77XX_BLUE);
    xmin = -1.5; xmax = 0.5;
    ymin = -1.0; ymax = 1.0;
    drawMandelbrot();
    cursorX = tft.width() / 2;
    cursorY = tft.height() / 2;
    saveRectBackground(cursorX, cursorY);
    drawZoomRect();
    delay(200);
  }

  // Taste CENTER ? Werte anzeigen
  if (digitalRead(KEY_CENTER) == LOW) {
    tft.fillScreen(ST77XX_BLUE);
    showCoordinates();
    //delay(500); // Kurze Pause, damit die Anzeige sichtbar bleibt
  }
}

void showCoordinates() {
  tft.setTextColor(ST77XX_WHITE);
  tft.setTextSize(3);
  tft.setCursor(15, 10); // Oben links
  tft.print(" xmin: \n "); tft.print(xmin, 8);tft.print("\n ");
  tft.print(" xmax: \n "); tft.println(xmax, 8);tft.print("\n ");
  tft.print(" ymin: \n "); tft.print(ymin, 8);tft.print("\n ");
  tft.print(" ymax: \n "); tft.println(ymax, 8);
}

// ================= MANDELBROT =================
void drawMandelbrot() {
  for (int y = 0; y < tft.height(); y++) {
    float ci = ymin + (ymax - ymin) * y / tft.height();
    for (int x = 0; x < tft.width(); x++) {
      float cr = xmin + (xmax - xmin) * x / tft.width();
      float zr = 0.0, zi = 0.0;
      int iter = 0;
      while (zr*zr + zi*zi <= 4.0 && iter < MAX_ITER) {
        float tmp = zr*zr - zi*zi + cr;
        zi = 2.0*zr*zi + ci;
        zr = tmp;
        iter++;
      }
      uint16_t color = (iter == MAX_ITER) ? PALETTE[0] : PALETTE[iter % PALETTE_SIZE];
      tft.drawPixel(x, y, color);
    }
  }
}
Die restlichen Funktionen sind für die Darstellung der Pixel auf dem Display und das Zoomen zuständig:
  // ================= ZOOM =================
void zoomOnCursor(bool zoomIn) {
  // Mittelpunkt des Rechtecks in Pixeln
  int centerX = cursorX;
  int centerY = cursorY;

  // Fraktal-Koordinaten des Rechteckmittelpunkts
  float cX0 = xmin + (xmax - xmin) * centerX / tft.width();
  float cY0 = ymin + (ymax - ymin) * centerY / tft.height();

  // Neue Breite/Höhe des Ausschnitts nach Zoom
  // Je kleiner zoomFactor, desto stärker gezoomt (kleinerer Ausschnitt)
  float xRange = (xmax - xmin) * (zoomIn ? zoomFactor : (1.0 / zoomFactor));
  float yRange = (ymax - ymin) * (zoomIn ? zoomFactor : (1.0 / zoomFactor));

  // xmin/ymin so setzen, dass der Fraktal-Mittelpunkt unter dem Rechteck bleibt
  xmin = cX0 - xRange * ((float)centerX / tft.width());
  ymin = cY0 - yRange * ((float)centerY / tft.height());
  xmax = xmin + xRange;
  ymax = ymin + yRange;

  // Rechteckmittelpunkt neu berechnen (falls durch Zoom verschoben)
  cursorX = (cX0 - xmin) / (xmax - xmin) * tft.width();
  cursorY = (cY0 - ymin) / (ymax - ymin) * tft.height();

  // Sicherheitsbegrenzung: Mittelpunkt innerhalb des Displays halten
  cursorX = constrain(cursorX, 0, tft.width() - 1);
  cursorY = constrain(cursorY, 0, tft.height() - 1);
}

// ================= RECHTECK =================
void drawZoomRect() {
  tft.drawRect(cursorX - RECT_HALF_W, cursorY - RECT_HALF_H, RECT_W, RECT_H, ST77XX_WHITE);
}

void saveRectBackground(int cx, int cy) {
  int x0 = cx - RECT_HALF_W;
  int y0 = cy - RECT_HALF_H;
  int idx = 0;

  // obere Kante
  for (int x = 0; x < RECT_W; x++)
    rectBackground[idx++] = getPixelColor(x0 + x, y0);
  // untere Kante
  for (int x = 0; x < RECT_W; x++)
    rectBackground[idx++] = getPixelColor(x0 + x, y0 + RECT_H - 1);
  // linke Kante
  for (int y = 0; y < RECT_H; y++)
    rectBackground[idx++] = getPixelColor(x0, y0 + y);
  // rechte Kante
  for (int y = 0; y < RECT_H; y++)
    rectBackground[idx++] = getPixelColor(x0 + RECT_W - 1, y0 + y);
}

void restoreRectBackground(int cx, int cy) {
  int x0 = cx - RECT_HALF_W;
  int y0 = cy - RECT_HALF_H;
  int idx = 0;
  for (int x = 0; x < RECT_W; x++) tft.drawPixel(x0 + x, y0, rectBackground[idx++]);
  for (int x = 0; x < RECT_W; x++) tft.drawPixel(x0 + x, y0 + RECT_H - 1, rectBackground[idx++]);
  for (int y = 0; y < RECT_H; y++) tft.drawPixel(x0, y0 + y, rectBackground[idx++]);
  for (int y = 0; y < RECT_H; y++) tft.drawPixel(x0 + RECT_W - 1, y0 + y, rectBackground[idx++]);
}

// ================= PIXELFARBE =================
uint16_t getPixelColor(int px, int py) {
  if (px < 0 || px >= tft.width() || py < 0 || py >= tft.height()) return PALETTE[0];

  float ci = ymin + (ymax - ymin) * py / tft.height();
  float cr = xmin + (xmax - xmin) * px / tft.width();
  float zr = 0.0, zi = 0.0;
  int iter = 0;
  while (zr*zr + zi*zi <= 4.0 && iter < MAX_ITER) {
    float tmp = zr*zr - zi*zi + cr;
    zi = 2.0*zr*zi + ci;
    zr = tmp;
    iter++;
  }
  return (iter == MAX_ITER) ? PALETTE[0] : PALETTE[iter % PALETTE_SIZE];
}