tried out part 1
1.28" Round-IPS-LCD-Touch Display -
Waveshare 24580
Tutorial for CircuitPython
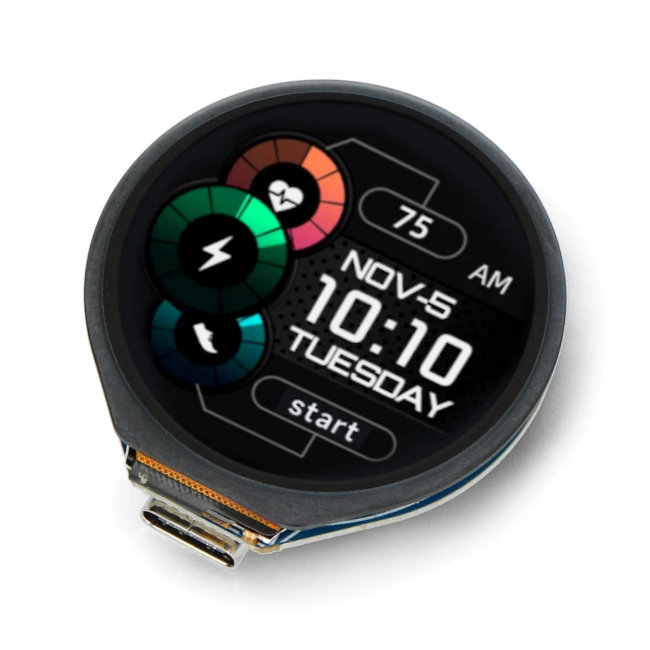
To get straight to the point: "With the round IPS 1.28" LCD touch display, we are at the very beginning of our own development projects and
such representations, as shown as a sample in the image above from Waveshare, are still miles away." Nevertheless, it was already a successful
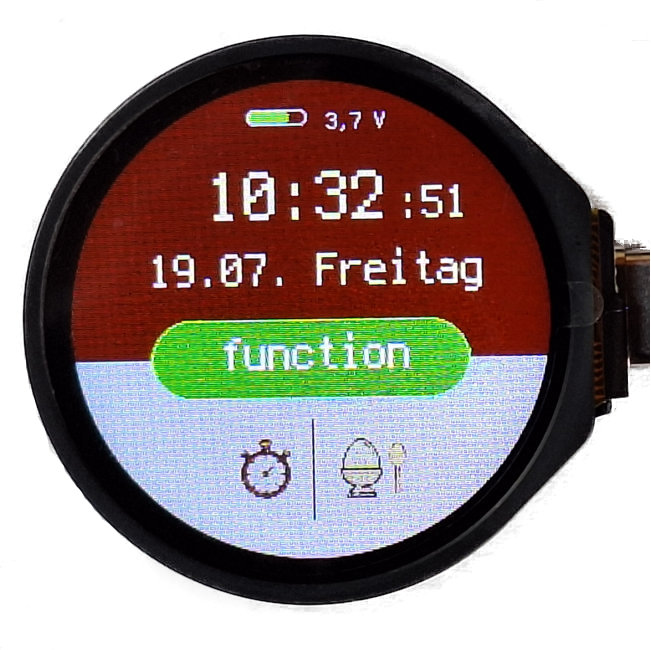
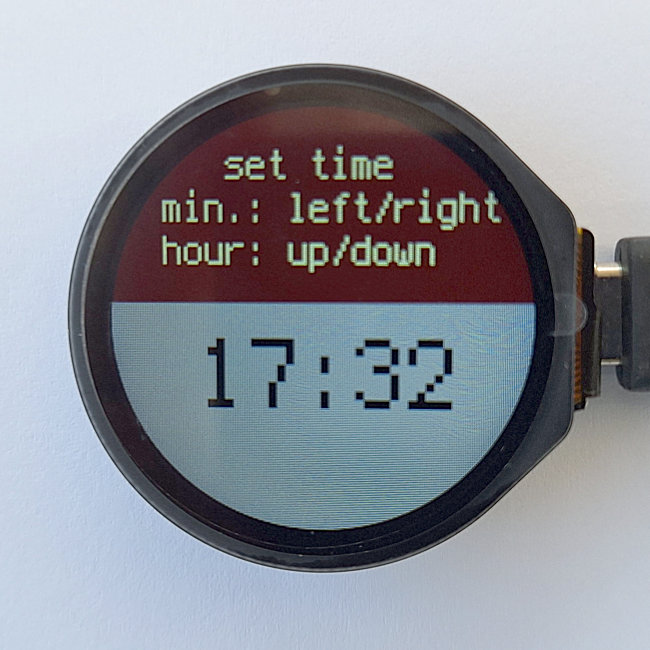
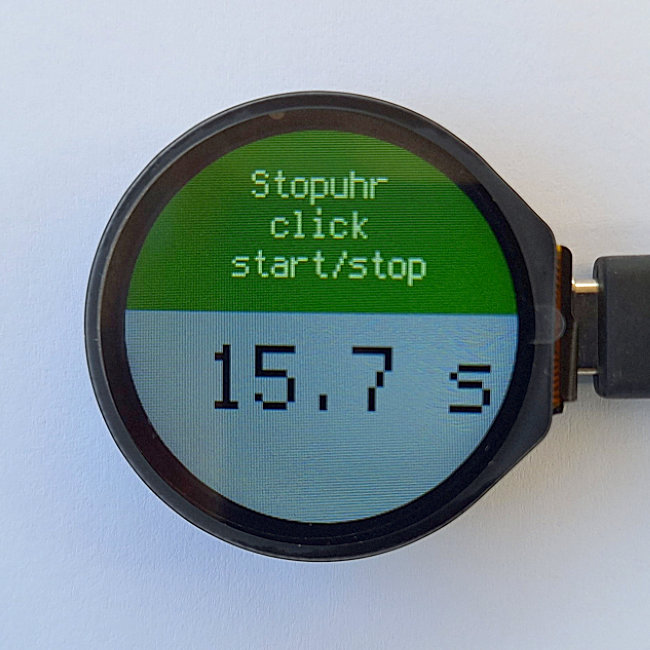
piece of work until the application shown below was finished and it works very well:
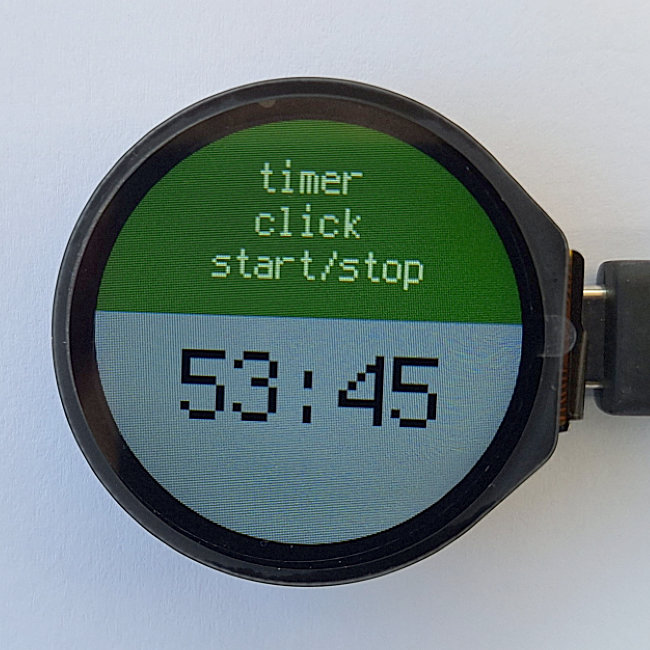
- A touch on the time switches to a screen where the clock can be set;
- Touching the stopwatch bitmap switches to a screen with a stopwatch function;
- Touching the breakfast egg bitmap switches to a screen with a timer function;
- To save power, the display goes dark after 10 seconds (not in the function screens) and turns bright again when you touch the green button.
Picture box 2 (click here)
If you run the RP 2040 with CircuitPython as
your firmware, you have to develop (almost) everything yourself, because there is currently no way to find something on the internet.
So I'll first look at how
you put the display into operation and test the touch functionality. First, the board needs to be flashed with the
firmware CircuitPython 9.0.5. A detailed description of this
you can find here
under the step 'Installing CircuitPython'.
After that copy the required libraries into the 'lib' folder. These are:
- cst816.py (Driver for the touch-sensor)
- gc9a01.py (Driver for the display)
- adafruit_display_shapes (Folder with drivers for graphical elements)
- adafruit_display_text (Folder with drivers for Textlabels)
- adafruit_imageload (Folder for displaying bitmaps)
- adafruit_ticks.mpy (Driver for time measurements)
If you download the zip file
from here
and unzip it, you can copy all the drivers mentioned suitable for CircuitPython 9.0.5 into the folder
'CICUITPY/lib'. Then all drivers are available for a first attempt.
This first attempt runs in Thonny's console and shows whether the display was found via I2C and the coordinates,
when you tap anywhere on the display. Copy the code from the box below into your Thonny IDE and run it.
(When copying and pasting into the Thonny IDE, the lines are moved down by one. So just delete
the empty line 1 so that the numbering matches my information again.) The function of the test is explained
in connection with the comments it practically comes naturally.
tried out part 1
1.28" Round-IPS-LCD-Touch Display -Waveshare 24580
Tutorial for CircuitPython
Picture box 2 (click here)
1  import time
2  import board
3  import busio
4  import cst816
5
6  # Touch Pins
7  #I2C_SDA = 6
8  #I2C_SDL = 7
9  #I2C_INT = 17
10 #I2C_RST = 16
11
12 # Initialize I2C
13 i2c = busio.I2C(board.GP7,board.GP6)
14 touch = cst816.CST816(i2c)
15
16 # Check if the touch controller is detected
17 if touch.who_am_i():
18     print("CST816 detected.")
19 else:
20     print("CST816 not detected.")
21
22 # Read touch data continuously
23 while True:
24     point = touch.get_point()
25     gesture = touch.get_gesture()
26     press = touch.get_touch()
27     distance = touch.get_distance()
28     print("Position: {0},{1} - Gesture: {2} - Pressed? {3} - Distance: {4},{5}".format(point.x_point, point.y_point, gesture, press, distance.x_dist, distance.y_dist))
29     time.sleep(0.05)
The most important thing from the test example are the four basic commands:
- point = touch.get_point()
- gesture = touch.get_gesture()
- press = touch.get_touch()
- distance = touch.get_distance()
Although the display is round, the coordinates (240x240 pixels) are determined like a square. Coordinates outside the
visible area are simply cut away.
With 'x = touch.x_point' and 'y = touch.y_point' you can determine the x and y coordinates on the display. But it plays
an important role whether the display has been rotated. With display.rotation = 0 the USB-C port is at the bottom
(see the image). The screen coordinates then match the 'touch coordinates'. The rectangle shown in the picture (with rounded
corners) has a length (x-direction) of 120 pixels and a width (y-direction) of 60 pixels for the coordinates shown.
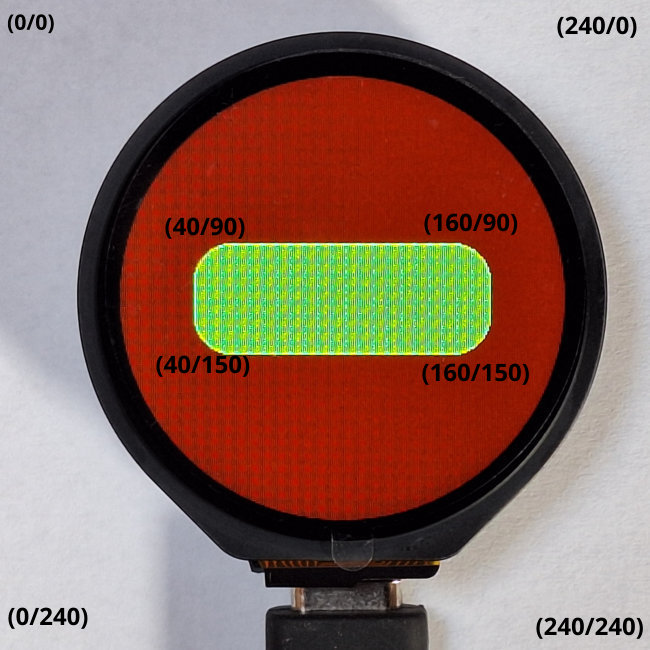
Display coordinates = touch coordinates
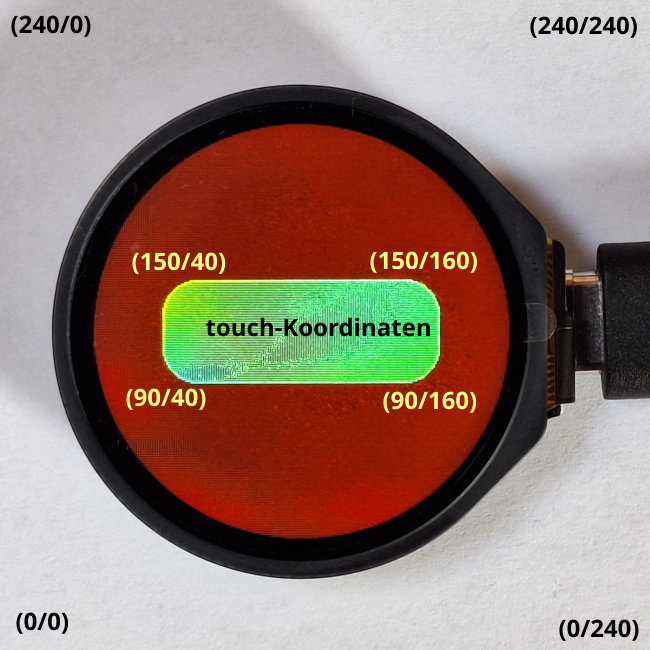
The situation is different when the screen is rotated by 90 degrees (this mainly occurs in clock applications). The value is then
display.rotation = 90 and the USB-C port is on the right. To display the rectangle on the display, select the
same coordinates as above, but the 'touch-coordinates' change because the touch field is firmly connected to the board.
See the next image below.
The following program illustrates this for you. In line 21, enter either display.rotation = 0 or
display.rotation = 90. When you touch the rectangle, it changes the color. So that only with the
'If touch' occurs, the press = touch.get_touch() is also used. The function always returns the
logical values True or False. A remark in advance about line 31. Here the touch mode
is set to the value 3. There are three options:
- touch.set_mode(1) - Point_Mode
- touch.set_mode(2) - Gesture_Mode
- touch.set_mode(3) - All_Mode.
Display coordinates = touch coordinates
1  import time
2  import board
3  import busio
4  import displayio
5  import terminalio
6  import gc9a01
7  import cst816
8  from adafruit_display_text import label
9  from adafruit_ticks import ticks_ms
10 from adafruit_display_shapes.rect import Rect
11 from adafruit_display_shapes.roundrect import RoundRect
12 from adafruit_display_shapes.circle import Circle
13 from adafruit_display_shapes.line import Line
14
15 # Release any resources currently in use for the displays
16 displayio.release_displays()
17 # Make the displayio SPI bus and the GC9A01 display
18 spi = busio.SPI(clock=board.GP10, MOSI=board.GP11)
19 display_bus = displayio.FourWire(spi, command=board.GP8, chip_select=board.GP9, reset=board.GP13)
20 display = gc9a01.GC9A01(display_bus, width=240, height=240, backlight_pin=board.GP25, brightness = 1)
21 display.rotation = 90
22
23 ##Touch Pins
24 # I2C_SDA = 6
25 # I2C_SDL = 7
26 # I2C_INT = 17
27 # I2C_RST = 16
28 # Initialize I2C
29 i2c = busio.I2C(scl=board.GP7, sda=board.GP6)
30 touch = cst816.CST816(i2c)
31 touch.set_mode(3)
32
33 # Make the display context
34 main_screen = displayio.Group()
35 display.root_group = main_screen
36
37 # make bitmap for the display background
38 background = displayio.Bitmap(240, 240, 1)
39 mypal = displayio.Palette(3)
40 mypal[0] = 0x800000
41 background.fill(0)
42 # Background oben
43 main_screen.append(displayio.TileGrid(background, pixel_shader=mypal))
44
45 # show the roundrect
46 roundrect= RoundRect(40,90,160,60,20,fill=0x009900, outline=0x00ff00)
47 main_screen.append(roundrect)
48
49 while True:
50     point = touch.get_point()
51     gesture = touch.get_gesture()
52     press = touch.get_touch()
53     if display.rotation == 0:
54         if touch.x_point > 40 and touch.x_point < 160 and point.y_point > 90 and point.y_point < 150 and press == True:
55             roundrect.fill = 0x0000ff
56         else:
57             roundrect.fill = 0x009900
58     if display.rotation == 90:
59         if touch.x_point > 90 and touch.x_point < 150 and point.y_point > 40 and point.y_point < 160 and press == True:
60             roundrect.fill = 0x0000ff
61         else:
62             roundrect.fill = 0x009900
The command gesture = touch.get_gesture() recognizes the gestures when you swipe over the display.
If display.rotation = 0 is, the gestures work as follows:
- gesture = 1 --> up
- gesture = 2 --> down
- gesture = 3 --> left
- gesture = 4 --> right
- gesture = 5 --> double click
- gesture = 12 --> long pressed
However, if the display is rotated by 90 degrees (display.rotation = 90), the following applies:
- gesture = 1 --> left
- gesture = 2 --> right
- gesture = 3 --> down
- gesture = 4 --> up
- gesture = 5 --> double click
- gesture = 12 --> long pressed
You can also use and test the small program in the bottom box in your Thonny for this purpose. Start without rotating the
display and then change all the necessary program lines so that the display is rotated 90 degrees and the gestures are recognized.
1  import time
2  import board
3  import busio
4  import displayio
5  import terminalio
6  import gc9a01
7  import cst816
8  from adafruit_display_text import label
9  from adafruit_ticks import ticks_ms
10 from adafruit_display_shapes.rect import Rect
11 from adafruit_display_shapes.roundrect import RoundRect
12 from adafruit_display_shapes.circle import Circle
13 from adafruit_display_shapes.line import Line
14
15 # Release any resources currently in use for the displays
16 displayio.release_displays()
17 # Make the displayio SPI bus and the GC9A01 display
18 spi = busio.SPI(clock=board.GP10, MOSI=board.GP11)
19 display_bus = displayio.FourWire(spi, command=board.GP8, chip_select=board.GP9, reset=board.GP13)
20 display = gc9a01.GC9A01(display_bus, width=240, height=240, backlight_pin=board.GP25, brightness = 1)
21 display.rotation = 0
22
23 ##Touch Pins
24 # I2C_SDA = 6
25 # I2C_SDL = 7
26 # I2C_INT = 17
27 # I2C_RST = 16
28 # Initialize I2C
29 i2c = busio.I2C(scl=board.GP7, sda=board.GP6)
30 touch = cst816.CST816(i2c)
31 touch.set_mode(3)
32
33 # Make the display context
34 main_screen = displayio.Group()
35 display.root_group = main_screen
36
37 # make bitmap for the display background
38 background = displayio.Bitmap(240, 240, 1)
39 mypal = displayio.Palette(3)
40 mypal[0] = 0x800000
41 background.fill(0)
42 # Background oben
43 main_screen.append(displayio.TileGrid(background, pixel_shader=mypal))
44
45 #create the label
46 updating_label = label.Label(font=terminalio.FONT, text="direction", scale=2, color=0xffffff, line_spacing=1)
47 updating_label.anchor_point = (0, 0)
48 updating_label.anchored_position = (75, 110)
49 main_screen.append(updating_label)
50
51 while True:
52     point = touch.get_point()
53     gesture = touch.get_gesture()
54     press = touch.get_touch()
55     if display.rotation == 0:
56         if gesture == 1 and press == True: # up
57             updating_label.text = "Hoch"
58             time.sleep(0.5)
59         if gesture == 2 and press == True: # down
60             updating_label.text = "Runter"
61             time.sleep(0.5)
62         if gesture == 3 and press == True: # left
63             updating_label.text = "Links"
64             time.sleep(0.5)
65         if gesture == 4 and press == True: # right
66             updating_label.text = "rechts"
67             time.sleep(0.5)
68         if gesture == 5 and press == True: # double click
69             updating_label.text = "Doubleclick"
70             time.sleep(1)
71         if gesture == 12 and press == True: # long
72             updating_label.text = "long pressed"
73             time.sleep(1)
74         print(gesture)
75     gesture = 0