Wenn Sie das Display vor dem Einlöten mit den Kabeln angeschlossen haben, konnten Sie bei richtiger Verkabelung bereits sehen,
das das Display arbeitet. Verwenden Sie einen beliebigen Pi Pico, installieren darauf ein aktuelles CircuitPython-Betriebssystem und
kopieren folgende Bibliotheken in den 'lib-Ordner': adafruit_display_shapes, adafruit_display_text und adafruit_st7789.mpy.
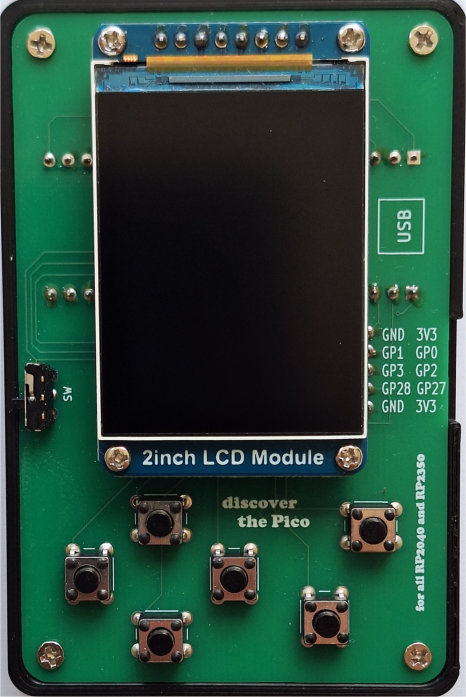
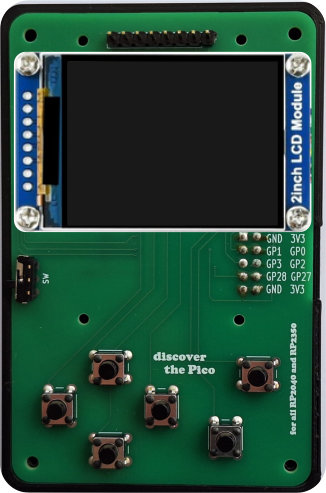
Stecken Sie den Pico auf der Platinenrückseite in die Buchsenleiste. Beachten Sie, dass die USB-Buchse nach der angezeigten Seite zeigt.
Mit dem folgenden Programmcode werden verschiedene Farben und Texte ausgegeben.
1  import time
2  import board
3  import digitalio
4  import displayio
5  import terminalio
6  import busio
7  import fourwire
8  from adafruit_st7789 import ST7789
9  from adafruit_display_shapes.rect import Rect
10 from adafruit_display_text import label
11
12 # 2 Zoll 320x240 Waveshare Display 19888
13 cs=board.GP21
14 dc=board.GP17
15 reset=board.GP20
16 bl=board.GP16
17 # Release any resources currently in use for the displays
18 displayio.release_displays()
19 spi = busio.SPI(board.GP18, board.GP19)
20 display_bus = fourwire.FourWire(spi, command=dc, chip_select=cs, reset=reset)
21 display = ST7789(display_bus, rotation=0, width=240, height=320, backlight_pin=bl, rowstart=0, colstart=0)
22 # Backlight: 0 - aus, 1 - an
23 display.brightness = 1
24 main = displayio.Group()
25 display.root_group = main
26
27 ## Make a background color
28 color_bitmap = displayio.Bitmap(display.width, display.height, 3)
29 color_palette = displayio.Palette(4)
30 color_palette[0] = 0xffffff
31 color_palette[1] = 0xff0000
32 color_palette[2] = 0x00ff00
33 color_palette[3] = 0x0000ff
34 bg_sprite = displayio.TileGrid(color_bitmap, pixel_shader=color_palette, x=0, y=0)
35 main.append(bg_sprite)
36
37 # Text
38 text_area = label.Label(terminalio.FONT, text="Discover the Pico", color=0xffff00)
39 text = displayio.Group(scale=2, x=20, y=10)
40 text.append(text_area)
41 main.append(text)
42
43 for i in range(5):
44     color_bitmap.fill(1)
45     time.sleep(0.2)
46     text.y += 40
47     color_bitmap.fill(2)
48     time.sleep(0.2)
49     text.y += 40
50     color_bitmap.fill(3)
51     time.sleep(0.2)
52     text.y += 40
53     if text.y >= 300:
54         text.y = 10
55
56 text_area.text = "   Ende Test 1"
Display im Querformat: Landscapeformat
1  import time
2  import board
3  import digitalio
4  import displayio
5  import terminalio
6  import busio
7  import fourwire
8  from adafruit_st7789 import ST7789
9  from adafruit_display_shapes.rect import Rect
10 from adafruit_display_text import label
11
12 # 2 Zoll 320x240 Waveshare Display 19888
13 cs=board.GP21
14 dc=board.GP17
15 reset=board.GP20
16 bl=board.GP16
17 # Release any resources currently in use for the displays
18 displayio.release_displays()
19 spi = busio.SPI(board.GP18, board.GP19)
20 display_bus = fourwire.FourWire(spi, command=dc, chip_select=cs, reset=reset)
21 display = ST7789(display_bus, rotation=90, width=320, height=240, backlight_pin=bl, rowstart=0, colstart=0)
22 # Backlight: 0 - aus, 1 - an
23 display.brightness = 1
24 main = displayio.Group()
25 display.root_group = main
26
27 ## Make a background color
28 color_bitmap = displayio.Bitmap(display.width, display.height, 3)
29 color_palette = displayio.Palette(4)
30 color_palette[0] = 0xffffff
31 color_palette[1] = 0xff0000
32 color_palette[2] = 0x00ff00
33 color_palette[3] = 0x0000ff
34 bg_sprite = displayio.TileGrid(color_bitmap, pixel_shader=color_palette, x=0, y=0)
35 main.append(bg_sprite)
36
37 # Text
38 text_area = label.Label(terminalio.FONT, text="Discover the Pico", color=0xffff00)
39 text = displayio.Group(scale=2, x=60, y=10)
40 text.append(text_area)
41 main.append(text)
42
43 for i in range(5):
44     color_bitmap.fill(1)
45     time.sleep(0.2)
46     text.y += 20
47     color_bitmap.fill(2)
48     time.sleep(0.2)
49     text.y += 20
50     color_bitmap.fill(3)
51     time.sleep(0.2)
52     text.y += 20
53     if text.y >= 220:
54         text.y = 10
55
56 text_area.text = "   Ende Test 2"
Kopieren Sie den Quellcode für 'test1.py' bzw. 'test2.py' in die Thonny-IDE und starten das Programm. Wenn alles richtig funktioniert, wechselt die
Displayfarbe und 'schiebt' dabei die Schrift "Discover the Pico" nach unten.
Als nächstes soll ein Test die Funktion der Button zeigen. Der Quellcode für das Hochformat sieht so aus:
1   import time
2   import board
3   import digitalio
4   import displayio
5   import busio
6   import fourwire
7   from adafruit_st7789 import ST7789
8   from adafruit_display_shapes.rect import Rect
9
10  # 2 Zoll 320x240 Waveshare Display 19888
11  # Portrait - Hochformat
12  cs=board.GP21
13  dc=board.GP17
14  reset=board.GP20
15  bl=board.GP16
16  # Release any resources currently in use for the displays
17  displayio.release_displays()
18  spi = busio.SPI(board.GP18, board.GP19)
19  display_bus = fourwire.FourWire(spi, command=dc, chip_select=cs, reset=reset)
20  display = ST7789(display_bus, rotation=0, width=240, height=320, backlight_pin=bl, rowstart=0, colstart=0)
21  # Backlight: 0 - aus, 1 - an
22  display.brightness = 1
23  main = displayio.Group()
24
25  # linke Reihe
26  button_up = digitalio.DigitalInOut(board.GP8)
27  button_up.switch_to_input(pull=digitalio.Pull.UP)
28  button_down = digitalio.DigitalInOut(board.GP7)
29  button_down.switch_to_input(pull=digitalio.Pull.UP)
30  button_right = digitalio.DigitalInOut(board.GP6)
31  button_right.switch_to_input(pull=digitalio.Pull.UP)
32  button_left = digitalio.DigitalInOut(board.GP9)
33  button_left.switch_to_input(pull=digitalio.Pull.UP)
34  button_A = digitalio.DigitalInOut(board.GP4)
35  button_A.switch_to_input(pull=digitalio.Pull.UP)
36  button_B = digitalio.DigitalInOut(board.GP5)
37  button_B.switch_to_input(pull=digitalio.Pull.UP)
38  ## extern
39  button_0 = digitalio.DigitalInOut(board.GP0)
40  button_0.switch_to_input(pull=digitalio.Pull.UP)
41  button_1 = digitalio.DigitalInOut(board.GP1)
42  button_1.switch_to_input(pull=digitalio.Pull.UP)
43  button_2 = digitalio.DigitalInOut(board.GP2)
44  button_2.switch_to_input(pull=digitalio.Pull.UP)
45  button_3 = digitalio.DigitalInOut(board.GP3)
46  button_3.switch_to_input(pull=digitalio.Pull.UP)
47  button_27 = digitalio.DigitalInOut(board.GP27)
48  button_27.switch_to_input(pull=digitalio.Pull.UP)
49  button_28 = digitalio.DigitalInOut(board.GP28)
50  button_28.switch_to_input(pull=digitalio.Pull.UP)
51
52
53  ## Make a background color fill for the weather
54  color_bitmap_temp = displayio.Bitmap(display.width, display.height, 3)
55  color_palette = displayio.Palette(1)
56  color_palette[0] = 0x660088
57  bg_sprite = displayio.TileGrid(color_bitmap_temp, pixel_shader=color_palette, x=0, y=0)
58  main.append(bg_sprite)
59
60  rect1 = Rect(60, 40, 40, 40, fill=0x666666)
61  main.append(rect1)
62  rect2 = Rect(60, 140, 40, 40, fill=0x666666)
63  main.append(rect2)
64  rect3 = Rect(110, 90, 40, 40, fill=0x666666)
65  main.append(rect3)
66  rect4 = Rect(10, 90, 40, 40, fill=0x666666)
67  main.append(rect4)
68
69  rect_0 = Rect(20, 210, 40, 40, fill=0x666666)
70  main.append(rect_0)
71  rect_1 = Rect(20, 270, 40, 40, fill=0x666666)
72  main.append(rect_1)
73  rect_2 = Rect(100, 210, 40, 40, fill=0x666666)
74  main.append(rect_2)
75  rect_3 = Rect(100, 270, 40, 40, fill=0x666666)
76  main.append(rect_3)
77  rect_27 = Rect(180, 210, 40, 40, fill=0x666666)
78  main.append(rect_27)
79  rect_28 = Rect(180, 270, 40, 40, fill=0x666666)
80 main.append(rect_28)
81
82  #rect_Y = Rect(270, 40, 40, 40, fill=0x666666)
83  #main.append(rect_Y)
84  rect_A = Rect(190, 60, 40, 40, fill=0x666666)
85  main.append(rect_A)
86  rect_B = Rect(170, 140, 40, 40, fill=0x666666)
87  main.append(rect_B)
88
89  display.root_group = main
90
91  while True:
92      if button_up.value == False:
93          rect1.fill = 0xff0000
94      else:
95          rect1.fill = 0x666666
96      if button_down.value == False:
97          rect2.fill = 0xff0000
98      else:
99          rect2.fill = 0x666666
100     if button_right.value == False:
101         rect3.fill = 0xff0000
102     else:
103         rect3.fill = 0x666666
104     if button_left.value == False:
105         rect4.fill = 0xff0000
106     else:
107         rect4.fill = 0x666666
108     if button_A.value == False:
109         rect_A.fill = 0xff0000
110     else:
111         rect_A.fill = 0x666666
112     if button_B.value == False:
113         rect_B.fill = 0xff0000
114     else:
115         rect_B.fill = 0x666666
116     # extern
117     if button_0.value == False:
118         rect_0.fill = 0xff0000
119     else:
120         rect_0.fill = 0x666666
121     if button_1.value == False:
122         rect_1.fill = 0xff0000
123     else:
124         rect_1.fill = 0x666666
125     if button_2.value == False:
126         rect_2.fill = 0xff0000
127     else:
128         rect_2.fill = 0x666666
129     if button_3.value == False:
130         rect_3.fill = 0xff0000
131     else:
132         rect_3.fill = 0x666666
133     if button_27.value == False:
134         rect_27.fill = 0xff0000
135     else:
136         rect_27.fill = 0x666666
137     if button_28.value == False:
138         rect_28.fill = 0xff0000
139     else:
140         rect_28.fill = 0x666666
Im Querformat ändern Sie nur die Zeile 20. Alles andere bleibt identisch:
20 display = ST7789(display_bus, rotation=90, width=320, height=240, backlight_pin=bl, rowstart=0, colstart=0)