Das nächste Projekt beschäftigt sich mit dem Neopixelring am PicoBoy-Color. Diese kleinen, intelligenten RGB LED Ringe oder Strips gibt es mit
unterschiedlich vielen LEDs. Sie können auch mit dem Mikrocontroller RP2040 und einer Bibliothek in CircuitPython angesteuert werden. Ich habe mich
für den Neopixelring mit 12 LEDs entschieden, den es für ca. 3.50 Euro
z.B. hier gibt.
Ein paar grundsätzliche Bemerkungen noch vorab. Neopixel-LEDs arbeiten mit 5 Volt Gleichstrom und müssen z.B. von einem Microcontroller
angesteuert werden, damit sie leuchten. Sie kommen auch mit 3,7-Volt einer Lithium-Polymer-Batterie zurecht. An den 3.3 Volt Ausgang des Microkontrollers
sind aufgrund der Stromaufnahme (die von der Anzahl und der Helligkeit der LEDs anhängt) recht enge Grenzen gesetzt. Ein 12-er Ring schaltet mitunter
den Spannungsregler des PicoBoy-Color ab, was im Test zum Reset des Microcontrollers führte und so den PicoBoy-Color vor der Zerstörung
schützt. Das kommt z.B. vor, wenn man die Helligkeit auf maximal stellt, und/oder alle LEDs gleichzeitig im RGB-Modus ansteuert. Für
größere Projekte ist deshalb dringend ein geeignetes getrenntes Netzteil erforderlich. Außerdem empfehle ich, sich einmal das komplette
Neopixel-Handbuch von Adafruit
durchzulesen.
Hardware / Software
- PicoBoy - Color
- Neopixelring 12 LED
- USB-C Kabel
- Firmware CircuitPython 10.0.0
- neopixel.mpy (aus dem CircuitPython Bundle)
Los gehts
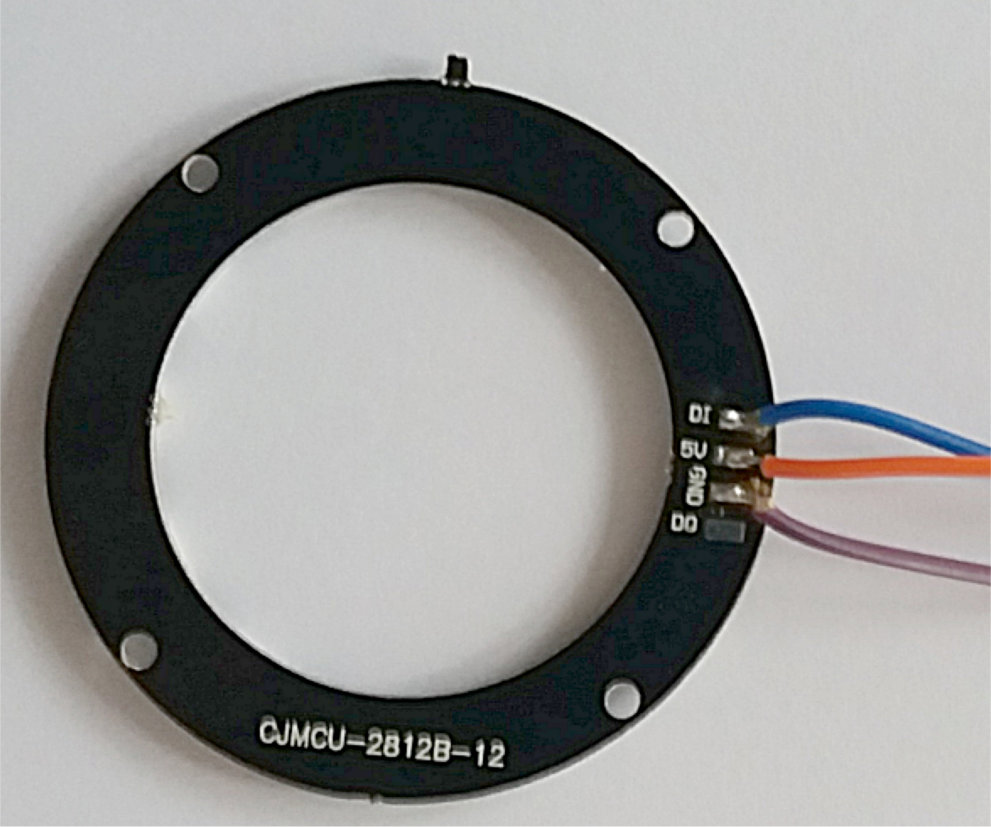
Da der Neopixelring ohne Anschlusskabel geliefert wird, müssen drei Kabel auf der Rückseite, wie im Foto zu sehen, angelötet
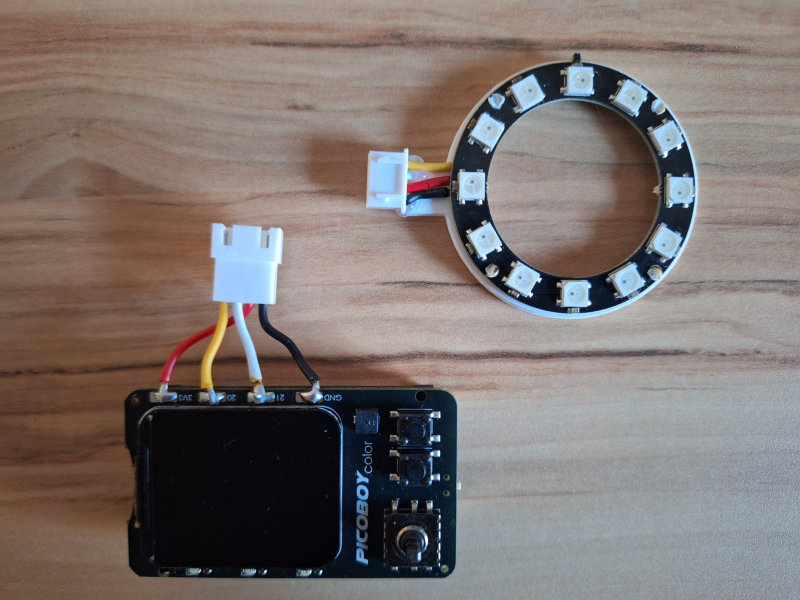
werden. Für die Nutzung am PicoBoy-Color hab ich wie beim Temperatursensor einen Stecker genommen.


* rot : + 5 V wird verbunden mit Lötpad 3V3 am PicoBoy
* schwarz: (im Bild 1 braun) GND wird verbunden mit Lötpad GND am PicoBoy
* gelb : (im Bild 1 blau) DI wird verbunden mit Pin 20 am PicoBoy
Nachdem das erledigt ist und auch die Bibliothek neopixel.mpy in den lib-Ordner des PicoBoy-Color kopiert wurde,
schauen wir uns einen ersten Effekt an. Dabei leuchten alle LED's rot, dann grün und schließlich blau und es folgt ein
"Regenbogeneffekt". Wegen der Hinweise zur Stromaufnahme wird dieser Effekt nicht(!) in eine Endlosschleife gepackt, sondern nur einmal
durchlaufen. Sie können den Effekt natürlich mehrfach starten und wiederholen.

1   import time
2   import board
3   import neopixel
4
5   # number of LEDs
6   num_pixels = 12
7
8   # Pin where NeoPixels are connected
9   pixel_pin = board.GP20
10
11  # The order of the pixel colors - RGB or GRB. Some NeoPixels have red and green reversed!
12  # For RGBW NeoPixels, simply change the ORDER to RGBW or GRBW.
13  ORDER = neopixel.GRB
14
15  pixels = neopixel.NeoPixel(pixel_pin, num_pixels, brightness=0.2, auto_write=False, pixel_order=ORDER)
16
17  def wheel(pos):
18      # Input a value 0 to 255 to get a color value.
19      # The colours are a transition r - g - b - back to r.
20      if pos < 0 or pos > 255:
21          r = g = b = 0
22      elif pos < 85:
23          r = int(pos * 3)
24          g = int(255 - pos * 3)
25          b = 0
26      elif pos < 170:
27          pos -= 85
28          r = int(255 - pos * 3)
29          g = 0
30          b = int(pos * 3)
31      else:
32          pos -= 170
33          r = 0
34          g = int(pos * 3)
35          b = int(255 - pos * 3)
36      return (r, g, b) if ORDER in (neopixel.RGB, neopixel.GRB) else (r, g, b, 0)
37
38  def rainbow_cycle(wait):
39      for j in range(255):
40          for i in range(num_pixels):
41              pixel_index = (i * 256 // num_pixels) + j
42              pixels[i] = wheel(pixel_index & 255)
43          pixels.show()
44          time.sleep(wait)
45
46  # Pixelring red
47  pixels.fill((255, 0, 0))
48  pixels.show()
49  time.sleep(1)
50  # Pixelring green
51  pixels.fill((0, 255, 0))
52  pixels.show()
53  time.sleep(1)
54  # Pixelring blue
55  pixels.fill((0, 0, 255))
56  pixels.show()
57  time.sleep(1)
58  for k in range(3):
59      # rainbow cycle with 1ms delay per step
60      rainbow_cycle(0.001)
61  # turn off all LEDs
62  pixels.fill((0 , 0, 0))
63  pixels.show()
In Zeile 6 wird die Anzahl der LEDs definiert und in Zeile 9 der GPIO des PicoBoy-Color. Zeile 15 definiert eine Variable 'pixels', die ein
Objekt aus der Klasse 'NeoPixel' enthält. Es folgen zwei Funktionen für die Drehung und den Regenbogeneffekt. Ab Zeile 46 erfolgt
dann die einmalige Anzeige. Die Ausführung erfolgt immer nach 'pixels.show()'. Zeile 62 schaltet alle LEDs ab.
Interessant ist auch der zweite Effekt. Dabei wird bei wechselnder Farbe eine immer schneller werdende Drehung erzeugt, die wieder mit einem
Regenbogeneffekt abschließt.
1   import time
2   import board
3   import neopixel
4
5   # Number of NeoPixels
6   num_pixels = 12
7
8   # Pin where NeoPixels are connected
9   pixel_pin = board.GP20
10
11  pixels = neopixel.NeoPixel(pixel_pin, num_pixels, brightness=0.15)
12
13  sine1 = [  # These are the pixels in order of animation - 12 pixels in total:
14      0, 1, 2, 3, 4, 5, 6, 7, 8, 9, 10, 11]
15
16  COLORS = (
17          (155,   0,   0),
18          (  0, 155,   0),
19          (  0,   0, 155),
20          (155, 155,   0),
21          (155,   0, 155),
22          (  0, 155, 155),
23          )
24
25  def colorwheel(pos):
26      if pos < 0 or pos > 255:
27          return (0, 0, 0, 0)
28      if pos < 85:
29          return (255 - pos * 3, pos * 3, 0, 0)
30      if pos < 170:
31          pos -= 85
32          return (0, 255 - pos * 3, pos * 3, 0)
33      pos -= 170
34      return (pos * 3, 0, 255 - pos * 3, 0)
35
36  def rainbow_cycle(wait):
37      for j in range(255):
38          for i in range(num_pixels):
39              rc_index = (i * 256 // num_pixels) + j
40              pixels[i] = colorwheel(rc_index & 255)
41          pixels.show()
42
43  while True:  # Loop forever...
44      for wait in range(10, 1, -2):
45          for color in COLORS:
46              for i in range(len(sine1)):
47                  # Set 'head' pixel to color:
48                  pixels[sine1[i]] = color
49                  # Erase 'tail,' 8 pixels back:
50                  pixels[sine1[(i + len(sine1) - 1) % len(sine1)]] = [0, 0, 0]
51                  pixels.write()  # Refresh LED states
52                  time.sleep(wait/300)  # xx millisecond delay
53      # rainbow cycle
54      rainbow_cycle(0)
In der nächsten Anleitung wird der PicoBoy-Color mit dem Display und den Tasten einbezogen. Bis dahin . . .
Viel Spass und Erfolg beim Ausprobieren.
Viel Spass und Erfolg beim Ausprobieren.